0%

理解 RESTful 架构 - 阮一峰
RESTful API 设计指南 - 阮一峰
RESTful API 最佳实践 - 阮一峰

Table of Contents

HTTP Methods

  • GET (SELECT) : 读取

  • POST (CREATE) : 新建

  • PUT (UPDATE) : 更新

  • PATCH (UPDATE) : 部分更新

  • DELETE (DELETE) : 删除

不常用的 http methods

  • HEAD : 获取资源的元数据

  • OPTIONS : 获取信息,关于资源的哪些属性是客户端可以改变

HTTP Status Codes

HTTP Status Codes - wikipedia

  • 1xx : 相关信息

  • 2xx : 操作成功

  • 3xx : 重定向

  • 4xx : 客户端错误

  • 5xx : 服务器错误

example

  • 200 OK - [GET/PUT/PATCH] : 获取或更新数据成功

  • 201 Created - [POST] : 新建数据成功

  • 202 Accepted - [*] : 表示服务器已经收到请求,但是还未处理,未来再进行处理(异步操作)

  • 204 No Content - [DELETE] : 删除数据成功

  • 400 Bad Request - [POST/PUT/PATCH] : 服务器不理解客户端的请求,未做任何处理

  • 401 Unauthorized : 用户未提供身份验证凭据,或者没有通过身份验证(没有权限)

  • 403 Forbidden : 用户通过了身份验证,但是不具有访问资源所需的权限(权限不足)

  • 404 Not Found : 所请求的资源不存在,或不可用

  • 405 Method Not Allowed : 用户已经通过身份验证,但是所用的 HTTP 方法不在他的权限之内

  • 406 Not Acceptable - [GET] : 服务器没有请求头(Accept headers)中指定的资源格式

  • 410 Gone - [GET] : 所请求的资源已从这个地址转移,不再可用

  • 415 Unsupported Media Type : 客户端发送的资源,不是服务器指定的资源格式(与 406 相反)

  • 422 Unprocessable Entity - [POST/PUT/PATCH] : 请求格式正确,但由于语义错误而无法遵循

  • 500 Internal Server Error : 服务器错误

  • 503 Service Unavailable : 服务器无法处理请求,一般用于网站维护状态

BEM 是块(block)、元素(element)、修饰符(modifier)的简写,由 Yandex 团队提出的一种前端 CSS 命名方法论

BEM 命名模式

1
2
3
4
5
6
7
8
.block {
}

.block__element {
}

.block--modifier {
}
  • 每一个块(block)名应该有一个命名空间(前缀)

  • block 代表了更高级别的抽象或组件

  • block__element 代表 .block 的后代,用于形成一个完整的 .block 的整体

  • block--modifier 代表 .block 的不同状态或不同版本。
    使用两个连字符和下划线而不是一个,是为了让你自己的块可以用单个连字符来界定。如:

    1
    2
    3
    4
    5
    .sub-block__element {
    }

    .sub-block--modifier {
    }

LESS SCSS

1
2
3
4
5
6
7
8
9
10
11
12
13
14
15
.article {
max-width: 1200px;
&__body {
padding: 20px;
}
&__button {
padding: 5px 8px;
&--primary {
background: blue;
}
&--success {
background: green;
}
}
}

Tips

  • 避免 .block__el1__el2 的格式

  • 在深层次嵌套的 DOM 结构下,应避免过长的样式名称定义

  • 层级最后不要超过 4 级,不然增加阅读的理解难度

Example

1
2
3
4
5
6
7
8
9
10
11
12
13
14
15
16
17
18
19
20
21
22
23
24
25
26
27
28
29
30
31
/* 常规写法: */
.xxx {
}
.xxx__item {
}
.xxx__item_current {
}

/* 嵌套写法 */
.xxx__item_current .mod-xxx__link {
}

/* 推荐: */
.xxx {
}
.xxx__item {
}
.xxx__item_hightlight {
}
.xxx__product-name {
}
.xxx__link {
}
.xxx__ming-zi-ke-yi-hen-chang {
}

/* 嵌套写法 */
.xxx__item_current {
.xxx__link {
}
}
1
2
3
4
5
6
7
8
9
10
11
12
13
14
15
16
17
18
19
20
21
22
23
24
<!-- 对应的HTML结构如下: -->
<ul class="xxx">
<li class="xxx__item">
第一项
<div class="xxx__product-name">我是名称</div>
<span class="xxx__ming-zi-ke-yi-hen-chang">
看类名
</span>
<a href="#" class="xxx__link">我是link</a>
</li>
<li></li>
<li class="xxx__item xxx__item_current">
第二项 且 当前选择项
<div class="xxx__product-name">我是名称</div>
<a href="#" class="xxx__item-link">我是link</a>
</li>
<li></li>
<li class="xxx__item xxx__item_hightlight">
第三项 且 特殊高亮
<div class="xxx__product-name">我是名称</div>
<a href="#" class="xxx__item-link">我是link</a>
</li>
<li></li>
</ul>

常用命名

名称 作用
.wrap 或 .wrapper 外侧包裹
.container 包裹容器
.header 用于头部
.body 页面 body
.footer 页面尾部
.aside 或 .sidebar 用于侧边栏
.content 和 header footer 对应,用于主要内容
.navigation 导航元素
.pagination 分页
.tabs > .tab tab 切换
.breadcrumbs 导航列表、面包屑
.dropdown 下拉菜单
.article 文章
.main 用于主体
.media 媒体资源
.thumbnail 或 .avatar 头像,小图像
.panel 面板
.tooltip 鼠标放置上去的提示
.popup 鼠标点击弹出的提示
.button 或 .btn 按钮
.ad 广告
.subnav 二级导航
.menu 菜单
.tag 标签
.message 或 .notice 提示消息
.summary 摘要
.logo logo
.search 搜索框
.login 登录
.register 注册
.banner 广告条
.copyright 版权
.modal 或 .dialog 弹窗

Table of Contents

react-router

提供了一些 router 的核心 api,包括 Router, Route, Switch 等,但是它没有提供 dom 操作进行跳转的 api

react-router-dom

提供了 BrowserRouter, Route, Link 等 api,可以通过 dom 的事件控制路由。例如点击一个按钮进行跳转,大多数情况下我们是这种情况,所以在开发过程中,我们更多是使用 react-router-dom

HashRouter/BrowserRouter

都提供路由的基本功能,可以随意选取其中一个

HashRouter

通过 hash 值来对路由进行控制。如果你使用 HashRouter,你的路由就会默认有#

1
2
3
<HashRouter>
<Route exact path="/" component={Home} />
</HashRouter>

BrowserRouter

  • 大部分情况下我们不需要这个#,因为它看起来很怪,这时我们就需要用到 BrowserRouter

  • 它的原理是使用 HTML5 history API (pushState, replaceState, popState)来使你的内容随着 url 动态改变的

1
2
3
<BrowserRouter basename="/app">
<Route exact path="/" component={Home} />
</BrowserRouter>

Route

  • Route 是路由的一个原材料,它是控制路径对应显示的组件。我们经常用的是 exact、path 以及 component 属性

  • exact 控制匹配到/路径时不会再继续向下匹配,path 标识路由的路径,component 表示路径对应显示的组件。后面我们将结合 NavLink 完成一个很基本的路由使用。同时我们可以设置例如/user/:id 的方式来控制页面的显示,这需要配合 Link 或者 NavLink 配合使用。下面我们会提到

1
<Route exact path="/" component={Home} />

两者都是可以控制路由跳转的,不同点是 NavLink 的 api 更多,更加满足你的需求

  • 主要 api 是 to,to 可以接受 string 或者一个 object,来控制 url

  • example

    1
    <Link to="/home" />
    1
    2
    3
    4
    5
    6
    7
    8
    <Link
    to={{
    pathname: '/home',
    search: '?sort=name',
    hash: '#the-hash',
    state: { x: true }
    }}
    />
  • 它可以为当前选中的路由设置类名、样式以及回调函数等

  • example

    1
    2
    3
    <NavLink exact activeClassName="active" to="/">
    home
    </NavLink>
  • exact 用于严格匹配,匹配到/则不会继续向下匹配,to 则是控制跳转的路径,activeClassName 是选中状态的类名,我们可以为其添加样式。我们在/second 后面添加 1234 来想路由中传递信息,这结合了上面 Route 中的/second/:id

  • match 是在使用 router 之后被放入 props 中的一个属性,在 class 创建的组件中我们需要通过 this.props.match 来获取 match 之中的信息。match 中包含的信息如下

Switch

常常会用来包裹 Route,它里面不能放其他元素,用来只显示一个路由

Table of Contents

Methods

  • GET (SELECT) : 读取

  • POST (CREATE) : 新建

  • PUT (UPDATE) : 更新

  • PATCH (UPDATE) : 部分更新

  • DELETE (DELETE) : 删除

不常用的 http methods

  • HEAD : 获取资源的元数据

  • OPTIONS : 询问请求 URI 资源支持的方法

Status Codes

HTTP Status Codes - wikipedia

  • 1xx : 相关信息

  • 2xx : 成功

  • 3xx : 重定向

  • 4xx : 客户端错误

  • 5xx : 服务器错误

2xx 操作成功
200 OK 客户端发来的请求在服务器端被正确处理
201 Created 新建资源成功
202 Accepted 表示服务器已经收到请求,但是还未处理,未来再进行处理(异步操作)
204 No Content 删除资源成功 – 表示请求成功,但响应报文不含实体的主体部分
3xx 重定向(表明浏览器要执行特殊处理)
301 Moved Permanently 永久性重定向,表示资源已被分配了新的 URL
302 Found 临时性重定向,表示资源临时被分配了新的 URL
303 See Other 表示资源存在着另一个 URL,应使用 GET 方法获取资源(对于 301/302/303 响应,几乎所有浏览器都会删除报文主体并自动用 GET 重新请求)
304 Not Modified 表示服务器允许访问资源,但请求未满足条件的情况(与重定向无关)
307 Temporary Redirect 临时重定向,和 302 含义类似,但是期望客户端保持请求方法不变向新的地址发出请求
4xx 客户端错误
400 Bad Request 服务器不理解客户端的请求,未做任何处理 – 请求报文存在语法错误
401 Unauthorized 表示发送的请求需要有通过 HTTP 认证的认证信息
403 Forbidden 用户通过了身份验证,但是不具有访问资源所需的权限(权限不足)
404 Not Found 请求资源不存在,或不可用
405 Method Not Allowed 用户已经通过身份验证,但是所用的 HTTP 方法不在他的权限之内
406 Not Acceptable 服务器没有请求头(Accept headers)中指定的资源格式
410 Gone 所请求的资源已从这个地址转移,不再可用
415 Unsupported Media Type 客户端发送的资源,不是服务器指定的资源格式(与 406 相反)
422 Unprocessable Entity 请求格式正确,但由于语义错误而无法遵循
5xx 服务器错误
500 Internal Server Error 服务器错误
501 Not Implemented 表示服务器不支持当前请求所需要的某个功能
503 Service Unavailable 服务器无法处理请求,一般用于网站维护状态

Headers

request headers
Accept 客户端能正确接收的媒体类型:application/json text/plain
Accept-Encoding 能正确接收的编码格式列表:gzip deflate
Authorization 客户端认证信息:Bearer dSdSdFFlsfdjasd123,一般存 token 用
response headers
ETag 资源标识,资源发生变化时标识也会发生改变
Location 客户端重定向到某个 URL
Server 服务器名字:Apache Nginx
Set-Cookie 需要存在客户端的信息,一般用于识别用户身份

Table of Contents

官方文档

路由懒加载

组件懒加载

  • 使用 Babel,添加 syntax-dynamic-import 插件

    1
    $ yarn add @babel/plugin-syntax-dynamic-import --dev

    .babelrc

    1
    2
    3
    {
    "plugins": ["@babel/plugin-syntax-dynamic-import"]
    }
  • 定义一个被 Webpack 自动代码分割的异步组件。

    1
    2
    3
    4
    5
    const Foo = () => import('./Foo.vue')

    const router = new VueRouter({
    routes: [{ path: '/foo', component: Foo }]
    })
  • 把组件按组分块

    有时候我们想把某个路由下的所有组件都打包在同个异步块 (chunk) 中,只需要使用命名 chunk,一个特殊的注释语法来提供 chunk name (需要 webpack > 2.4)

    1
    2
    3
    const Foo = () => import(/* webpackChunkName: "group-foo" */ './Foo.vue')
    const Bar = () => import(/* webpackChunkName: "group-foo" */ './Bar.vue')
    const Baz = () => import(/* webpackChunkName: "group-foo" */ './Baz.vue')

    webpack 会将任何一个异步模块与相同的块名称组合到相同的异步块中

meta

路由元信息

  • 定义路由的时候可以配置 meta 字段:

    1
    2
    3
    4
    5
    6
    7
    8
    9
    10
    11
    12
    13
    14
    15
    16
    const router = new VueRouter({
    routes: [
    {
    path: '/foo',
    component: Foo,
    children: [
    {
    path: 'bar',
    component: Bar,
    // a meta field
    meta: { requiresAuth: true }
    }
    ]
    }
    ]
    })

导航守卫

1
2
3
4
5
const router = new VueRouter({ ... })

router.beforeEach((to, from, next) => {
// ...
})
  • to: Route 即将要进入的目标 路由对象

  • from: Route 当前导航正要离开的路由

  • next: Function 一定要调用该方法来 resolve 这个钩子。执行效果依赖 next 方法的调用参数

    • next(): 进行管道中的下一个钩子。如果全部钩子执行完了,则导航的状态就是 confirmed (确认的)

    • next(false): 中断当前的导航。如果浏览器的 URL 改变了(可能是用户手动或者浏览器后退按钮),那么 URL 地址会重置到 from 路由对应的地址

    • next(‘/‘) 或者 next({ path: ‘/‘ }): 跳转到一个不同的地址。当前的导航被中断,然后进行一个新的导航。你可以向 next 传递任意位置对象,且允许设置诸如 replace: true、name: ‘home’ 之类的选项以及任何用在 router-link 的 to prop 或 router.push 中的选项

    • next(error): (2.4.0+) 如果传入 next 的参数是一个 Error 实例,则导航会被终止且该错误会被传递给 router.onError() 注册过的回调

编程式导航

  • 声明式

    1
    <router-link :to="..."></router-link>
  • 编程式

    1
    router.push(location, onComplete?, onAbort?)

官方文档

Table of Contents

extend

vue extend

Vue.extend(options)

1
2
3
4
5
6
7
8
9
10
11
12
13
14
15
// 注册组件,传入一个扩展过的构造器
Vue.component(
'my-component',
Vue.extend({
/* ... */
})
)

// 注册组件,传入一个选项对象 (自动调用 Vue.extend)
Vue.component('my-component', {
/* ... */
})

// 获取注册的组件 (始终返回构造器)
var MyComponent = Vue.component('my-component')
1
2
3
4
5
6
7
8
9
10
11
12
13
var MyComponent = Vue.extend({
template: '<div>Hello!</div>'
})

// 创建并挂载到 #app (会替换 #app)
new MyComponent().$mount('#app')

// 同上
new MyComponent({ el: '#app' })

// 或者,在文档之外渲染并且随后挂载
var component = new MyComponent().$mount()
document.getElementById('app').appendChild(component.$el)

slot

vue slots

1
<slot></slot>

plugins

vue plugins

Vue.js 的插件应当有一个公开方法 install,这个方法的第一个参数是 Vue 构造器,第二个参数是一个可选的选项对象:

1
2
3
4
5
6
7
8
9
10
11
12
13
14
15
16
17
18
19
20
21
22
23
24
25
26
27
MyPlugin.install = function (Vue, options) {
// 1. 添加全局方法或属性
Vue.myGlobalMethod = function () {
// 逻辑...
}

// 2. 添加全局资源
Vue.directive('my-directive', {
bind (el, binding, vnode, oldVnode) {
// 逻辑...
}
...
})

// 3. 注入组件
Vue.mixin({
created: function () {
// 逻辑...
}
...
})

// 4. 添加实例方法
Vue.prototype.$myMethod = function (methodOptions) {
// 逻辑...
}
}

directive

vue directive

inserted :被绑定元素插入父节点时调用 (仅保证父节点存在,但不一定已被插入文档中)。

1
2
3
4
5
6
7
8
// 注册一个全局自定义指令 `v-focus`
Vue.directive('focus', {
// 当被绑定的元素插入到 DOM 中时……
inserted: function(el) {
// 聚焦元素
el.focus()
}
})

sync modifier

sync modifier

prop 进行“双向绑定”

keep alive

keep-alive

  • 当组件在 <keep-alive> 内被切换,它的 activateddeactivated 这两个生命周期钩子函数将会被对应执行

  • 主要用于保留组件状态或避免重新渲染

watch

  • vm $watch

    • deep: true 监听对象内部值的变化
    1
    2
    3
    4
    5
    vm.$watch('someObject', callback, {
    deep: true
    })
    vm.someObject.nestedValue = 123
    // callback is fired
  • watch

    1
    2
    3
    4
    5
    6
    7
    8
    9
    10
    11
    12
    13
    14
    15
    16
    17
    18
    19
    20
    21
    22
    23
    24
    25
    26
    27
    28
    29
    30
    31
    32
    33
    34
    35
    36
    37
    38
    39
    40
    41
    42
    43
    44
    45
    46
    47
    var vm = new Vue({
    data: {
    a: 1,
    b: 2,
    c: 3,
    d: 4,
    e: {
    f: {
    g: 5
    }
    }
    },
    watch: {
    a: function(val, oldVal) {
    console.log('new: %s, old: %s', val, oldVal)
    },
    // 方法名
    b: 'someMethod',
    // 深度 watcher
    c: {
    handler: function(val, oldVal) {
    /* ... */
    },
    deep: true
    },
    // 该回调将会在侦听开始之后被立即调用
    d: {
    handler: function(val, oldVal) {
    /* ... */
    },
    immediate: true
    },
    e: [
    function handle1(val, oldVal) {
    /* ... */
    },
    function handle2(val, oldVal) {
    /* ... */
    }
    ],
    // watch vm.e.f's value: {g: 5}
    'e.f': function(val, oldVal) {
    /* ... */
    }
    }
    })
    vm.a = 2 // => new: 2, old: 1

ref

ref

ref 被用来给元素或子组件注册引用信息。引用信息将会注册在父组件的 $refs 对象上。如果在普通的 DOM 元素上使用,引用指向的就是 DOM 元素;如果用在子组件上,引用就指向组件实例

Flex 布局教程:语法篇 - 阮一峰

Table of Contents

Introduction

  • 任何一个容器都可以指定为 Flex 布局

    1
    2
    3
    4
    5
    6
    7
    8
    .box {
    display: flex;
    }

    /* 行内元素也可以使用 Flex 布局 */
    .box {
    display: inline-flex;
    }

注意:设为 Flex 布局以后,子元素的 floatclearvertical-align 属性将失效。

Container

  • 采用 Flex 布局的元素,称为 Flex 容器(flex container),简称“容器”。它的所有子元素自动成为容器成员,称为 Flex 项目(flex item),简称“项目”

  • 以下 6 个属性设置在容器上

    1. flex-direction

    2. flex-wrap

    3. flex-flow

    4. justify-content

    5. align-items

    6. align-content

flex-direction

  • flex-direction 决定主轴的方向(即项目的排列方向)。

    1
    2
    3
    .box {
    flex-direction: row | row-reverse | column | column-reverse;
    }
  • 它可能有 4 个值

    1. row(默认值):主轴为水平方向,起点在左端

    2. row-reverse:主轴为水平方向,起点在右端

    3. column:主轴为垂直方向,起点在上沿

    4. column-reverse:主轴为垂直方向,起点在下沿

flex-direction-image

flex-wrap

  • 默认情况下,项目都排在一条线(又称”轴线”)上。flex-wrap 属性定义,如果一条轴线排不下,如何换行

    flex-wrap-image

    1
    2
    3
    .box {
    flex-wrap: nowrap | wrap | wrap-reverse;
    }
  • 它可能取三个值

    1. nowrap(默认):不换行

      flex-wrap-nowrap

    2. wrap:换行,第一行在上方

      flex-wrap-wrap

    3. wrap-reverse:换行,第一行在下方

      flex-wrap-wrap-reverse

flex-flow

  • flex-flow 属性是 flex-direction 属性和 flex-wrap 属性的简写形式,默认值为 row nowrap

    1
    2
    3
    .box {
    flex-flow: <flex-direction> || <flex-wrap>;
    }

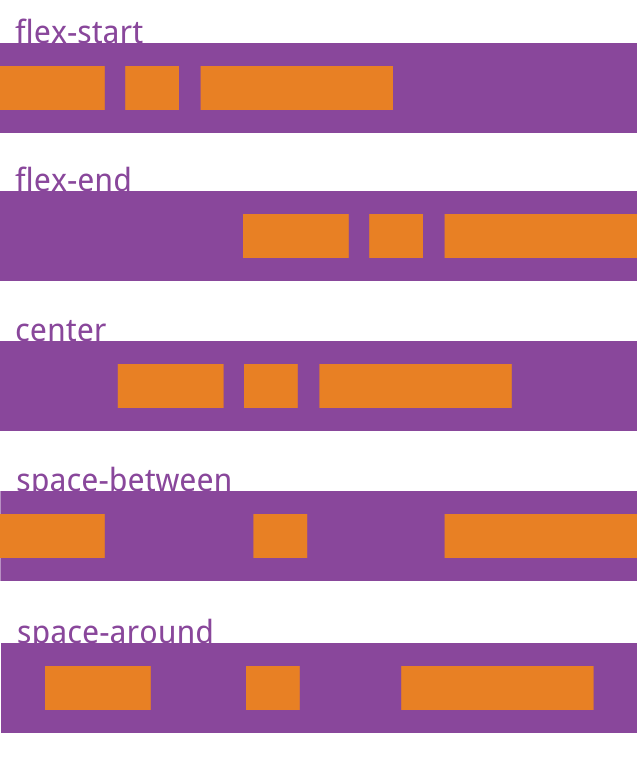
justify-content

  • justify-content 属性定义了项目在主轴上的对齐方式。

    1
    2
    3
    4
    .box {
    justify-content: flex-start | flex-end | center | space-between |
    space-around;
    }

    justify-content-image

  • 它可能取 5 个值,具体对齐方式与轴的方向有关。下面假设主轴为从左到右

    1. flex-start(默认值):左对齐

    2. flex-end:右对齐

    3. center: 居中

    4. space-between:两端对齐,项目之间的间隔都相等

    5. space-around:每个项目两侧的间隔相等。所以,项目之间的间隔比项目与边框的间隔大一倍

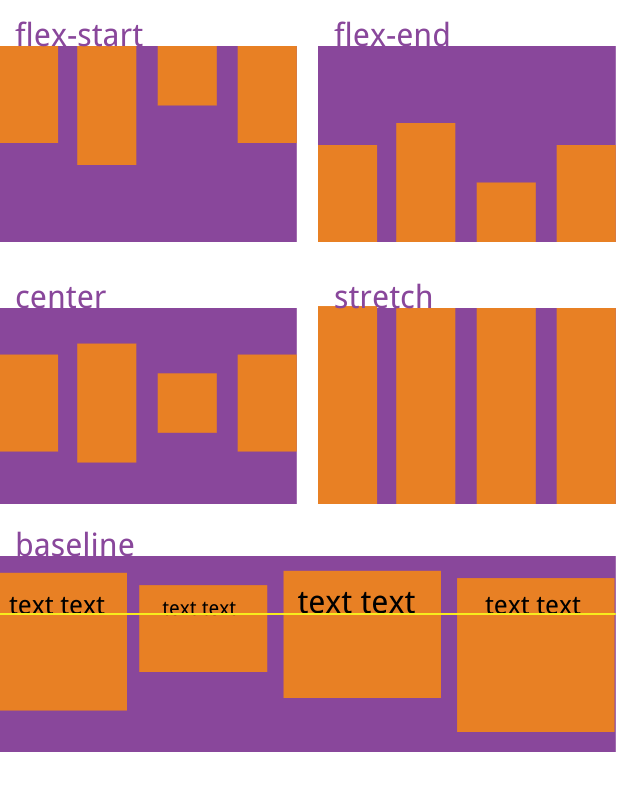
align-items

  • align-items 属性定义项目在交叉轴上如何对齐。

    1
    2
    3
    .box {
    align-items: flex-start | flex-end | center | baseline | stretch;
    }

    align-items-image

  • 它可能取 5 个值。具体的对齐方式与交叉轴的方向有关,下面假设交叉轴从上到下

    1. flex-start:交叉轴的起点对齐

    2. flex-end:交叉轴的终点对齐

    3. center:交叉轴的中点对齐

    4. baseline: 项目的第一行文字的基线对齐

    5. stretch(默认值):如果项目未设置高度或设为 auto,将占满整个容器的高度

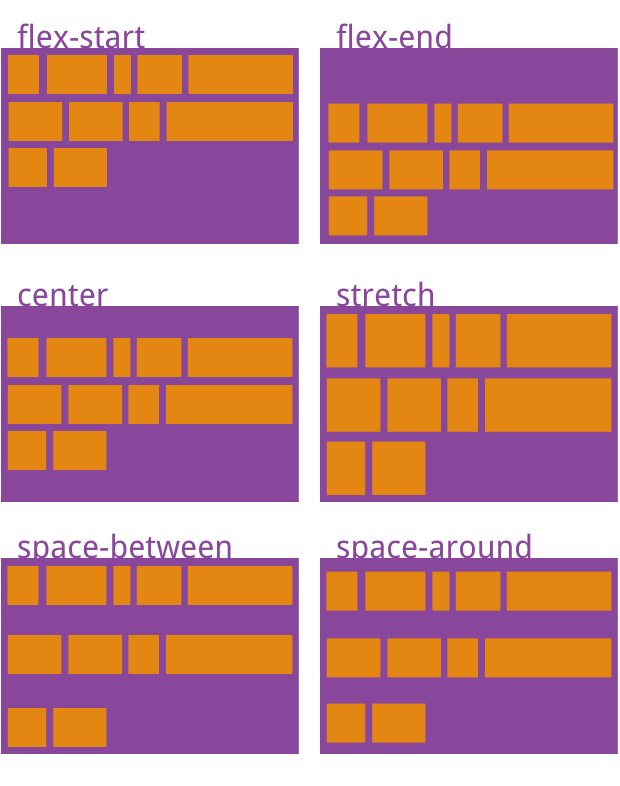
align-content

  • align-content 属性定义了多根轴线的对齐方式。如果项目只有一根轴线,该属性不起作用。

    1
    2
    3
    4
    .box {
    align-content: flex-start | flex-end | center | space-between | space-around
    | stretch;
    }

    align-content-image

  • 该属性可能取 6 个值

    1. flex-start:与交叉轴的起点对齐

    2. flex-end:与交叉轴的终点对齐

    3. center:与交叉轴的中点对齐

    4. space-between:与交叉轴两端对齐,轴线之间的间隔平均分布

    5. space-around:每根轴线两侧的间隔都相等。所以,轴线之间的间隔比轴线与边框的间隔大一倍

    6. stretch(默认值):轴线占满整个交叉轴

Item

以下 6 个属性设置在项目上

  1. order

  2. flex-grow

  3. flex-shrink

  4. flex-basis

  5. item flex

  6. align-self

order

  • order 属性定义项目的排列顺序。数值越小,排列越靠前,默认为 0

    1
    2
    3
    .item {
    order: <integer>;
    }

    order-image

flex-grow

  • flex-grow 属性定义项目的放大比例,默认为 0,即如果存在剩余空间,也不放大

    1
    2
    3
    .item {
    flex-grow: <number>; /* default 0 */
    }

    flex-grow-image

  • 如果所有项目的 flex-grow 属性都为 1,则它们将等分剩余空间(如果有的话)。如果一个项目的 flex-grow 属性为 2,其他项目都为 1,则前者占据的剩余空间将比其他项多一倍

flex-shrink

  • flex-shrink 属性定义了项目的缩小比例,默认为 1,即如果空间不足,该项目将缩小

    1
    2
    3
    .item {
    flex-shrink: <number>; /* default 1 */
    }

    flex-shrink-image

  • 如果所有项目的 flex-shrink 属性都为 1,当空间不足时,都将等比例缩小。如果一个项目的 flex-shrink 属性为 0,其他项目都为 1,则空间不足时,前者不缩小。

负值对该属性无效

flex-basis

  • flex-basis 属性定义了在分配多余空间之前,项目占据的主轴空间(main size)。浏览器根据这个属性,计算主轴是否有多余空间。它的默认值为auto,即项目的本来大小

    1
    2
    3
    .item {
    flex-basis: <length> | auto; /* default auto */
    }
  • 它可以设为跟 widthheight 属性一样的值(比如 350px),则项目将占据固定空间

item flex

  • flex 属性是 flex-grow , flex-shrinkflex-basis 的简写,默认值为0 1 auto。后两个属性可选

    1
    2
    3
    .item {
    flex: none | [ < 'flex-grow' > < 'flex-shrink' >? || < 'flex-basis' > ];
    }
  • 该属性有两个快捷值:auto (1 1 auto) 和 none (0 0 auto)

  • 建议优先使用这个属性,而不是单独写三个分离的属性,因为浏览器会推算相关值

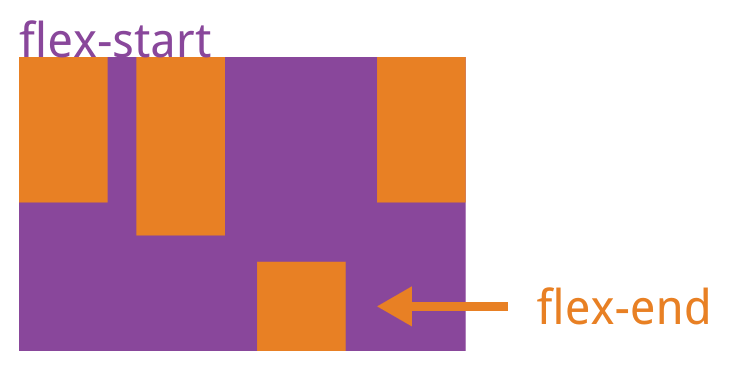
align-self

  • align-self 属性允许单个项目有与其他项目不一样的对齐方式,可覆盖 align-items 属性。默认值为 auto,表示继承父元素的 align-items 属性,如果没有父元素,则等同于 stretch

    1
    2
    3
    .item {
    align-self: auto | flex-start | flex-end | center | baseline | stretch;
    }

    align-self-image

  • 该属性可能取 6 个值,除了 auto,其他都与 align-items 属性完全一致。

Table of Contents

extend-click

扩展小图标的触区(点击区域)

1
2
3
4
5
6
7
8
9
10
11
12
.extend-click {
position: relative;

&:before {
content: '';
position: absolute;
top: -10px;
left: -10px;
right: -10px;
bottom: -10px;
}
}

wrap

  • 强制不换行

    1
    2
    3
    .box {
    white-space: nowrap;
    }
  • 自动换行

    1
    2
    3
    4
    .box {
    word-wrap: break-word;
    word-break: normal;
    }
  • 强制英文单词断行

    1
    2
    3
     {
    word-break: break-all;
    }

ellipsis

1
2
3
4
5
6
7
8
9
10
11
12
13
14
15
16
17
/* 单行溢出隐藏 */
.ellipsis() {
overflow: hidden;
text-overflow: ellipsis;
white-space: nowrap;
}

/* 多行溢出隐藏 */
.multi-ellipsis(@lines) {
display: -webkit-box;
overflow: hidden;
text-overflow: ellipsis;
-webkit-line-clamp: @lines;
/*! autoprefixer: off */
-webkit-box-orient: vertical;
/* autoprefixer: on */
}
  • -webkit-box-orient 是一个过时的属性,postcss 一类的工具会将它默认移除,所以需要取消处理,不然不能起作用

  • 多行适用范围

    因使用了 WebKit 的 CSS 扩展属性,该方法适用于 WebKit 浏览器及移动端

  • 注:

    1. -webkit-line-clamp 用来限制在一个块元素显示的文本的行数。 为了实现该效果,它需要组合其他的 WebKit 属性,常见结合属性:

    2. display: -webkit-box; 必须结合的属性 ,将对象作为弹性伸缩盒子模型显示

    3. -webkit-box-orient 必须结合的属性 ,设置或检索伸缩盒对象的子元素的排列方式

clearfix

清除浮动

1
2
3
4
5
6
7
8
9
10
11
12
13
.clearfix() {
zoom: 1;

&::before,
&::after {
display: table;
content: '';
}

&::after {
clear: both;
}
}

hairline

移动端 1px border

1
2
3
4
5
6
7
8
9
10
11
12
13
14
15
16
17
18
19
20
21
22
23
24
25
26
27
.hairline-common() {
position: absolute;
box-sizing: border-box;
pointer-events: none;
content: ' ';
}

.hairline(@border-color: #ebedf0) {
.hairline-common();

top: -50%;
right: -50%;
bottom: -50%;
left: -50%;
border: 0 dashed @border-color;
transform: scale(0.5);
}

.hairline-bottom(@border-color: #ebedf0, @left: 0) {
.hairline-common();

right: 0;
bottom: 0;
left: @left;
border-bottom: 1px solid @border-color;
transform: scaleY(0.5);
}

Getting Started on Heroku with Node.js

  • 在 Heroku 上创建一个应用程序,准备 Heroku 来接收你的源代码

    1
    2
    3
    4
    $ heroku create
    Creating sharp-rain-871... done, stack is cedar-14
    http://sharp-rain-871.herokuapp.com/ | https://git.heroku.com/sharp-rain-871.git
    Git remote heroku added
    1
    2
    3
    4
    5
    6
    $ git init
    $ heroku git:remote -a <name>

    $ git add .
    $ git commit -m 'cm msg'
    $ git push heroku master
  • 当您创建应用程序时,heroku 还会创建一个 git remote(调用)并将其与本地 git 存储库关联

    Heroku 会 sharp-rain-871 为您的应用程序生成一个随机名称(在这种情况下),或者您可以传递一个参数来指定您自己的应用程序名称。

    现在部署你的代码:

    1
    $ git push heroku master
  • 该应用程序现在已部署。确保至少有一个应用程序实例正在运行:

    1
    2
    3
    4
    5
    6
    7
    8
    9
    10
    11
    12
    13
    14
    15
    16
    17
    18
    19
    20
    21
    22
    23
    24
    25
    26
    27
    28
    29
    30
    31
    32
    33
    34
    35
    36
    $ heroku ps:scale web=1
    Counting objects: 343, done.
    Delta compression using up to 4 threads.
    Compressing objects: 100% (224/224), done.
    Writing objects: 100% (250/250), 238.01 KiB, done.
    Total 250 (delta 63), reused 0 (delta 0)
    remote: Compressing source files... done.
    remote: Building source:
    remote:
    remote: -----> Node.js app detected
    remote:
    remote: -----> Creating runtime environment
    remote:
    remote: NPM_CONFIG_LOGLEVEL=error
    remote: NPM_CONFIG_PRODUCTION=true
    remote: NODE_MODULES_CACHE=true
    remote:
    remote: -----> Installing binaries
    remote: engines.node (package.json): 5.9.1
    remote: engines.npm (package.json): unspecified (use default)
    remote:
    remote: Downloading and installing node 5.9.1...
    remote: Using default npm version: 2.7.4
    ....
    remote: -----> Build succeeded!
    remote: ├── ejs@2.4.1
    remote: └── express@4.13.3
    remote:
    remote: -----> Discovering process types
    remote: Procfile declares types -> web
    remote:
    remote: -----> Compressing... done, 9.4MB
    remote: -----> Launching... done, v8
    remote: http://sharp-rain-871.herokuapp.com deployed to Heroku
    To https://git.heroku.com/nameless-savannah-4829.git
    * [new branch] master -> master
  • 现在通过其应用程序名称生成的 URL 访问该应用程序。作为一个方便的捷径,你可以打开网站如下:

    1
    $ heroku open
  • 您可以使用以下 ps 命令来检查多少个 dynos 正在运行:

    1
    2
    3
    $ heroku ps
    === web (Free): `node index.js`
    web.1: up 2014/04/25 16:26:38 (~ 1s ago)

ssh-keygen

1
2
3
4
ssh-keygen -t rsa -b 4096 -C "your_email@example.com"

# 默认目录 公钥
cat ~/.ssh/id_rsa.pub
  • GitHub Add SSH Key 粘贴 id_rsa.pub 文件的内容

  • 检验是否连接上 GitHub ssh git@github.com

配置 - config

1
2
3
4
5
# 查看配置列表
git config -l

git config --global user.name "your_name"
git config --global user.email "your_email@example.com"

别名 - alias

1
2
3
4
5
6
7
git config --global alias.st status

git config --global alias.ck checkout

git config --global alias.cm commit

git config --global alias.br branch

克隆 - clone

1
2
3
4
5
6
7
8
9
10
11
12
13
14
# 拉取远程仓库,支持 git:// (ssh), <https://> 等协议
git clone <url>

# 仓库太大,拉取最近的一个 revision
git clone <url> --depth=1

# 克隆某个分支
git clone -b dev <url>

# 递归克隆,如果有 `submodule` 一并克隆
git clone --recursive <url>

# 继续拉取历史版本
git fetch --unshallow

初始化 - initial

1
2
3
4
5
6
7
8
9
10
11
12
13
14
15
16
17
# 初始化 git 仓库
git init

# 添加文件到暂存区
git add <filename>

# 递归添加整个目录到暂存区
git add .

# 提交暂存区内容到仓库
git commit -m 'commit msg'

# 提交显示 diff 变化
git commit -v

# 查看工作区的状态
git status

远程 - remote

1
2
3
4
5
6
7
8
9
10
11
12
13
14
15
# 关联远程仓库
git remote add origin <url>

# 查看远程库信息
git remote -v

# 拉取远程仓库分支
git checkout -b branch-name origin/branch-name

# 拉取,不进行合并
git fetch origin master

# 等效于 git fetch && git merge
git pull
git pull origin remove_branch:local_branch

推送 - push

1
2
3
4
5
6
7
8
9
10
11
# 远程已有 remote_branch 分支,并且已经关联本地分支 local_branch
git push

# 强制推送到远程分支
git push -f

# 远程已有 remote_branch 分支但未关联本地分支 local_branch, -u 首次推送
git push -u origin/remote_branch

# 远程没有 remote_branch 分支,并且没有关联本地分支 local_branch
git push origin local_branch:remote_branch

推送到远程分支

  1. git push origin branch-name,如果推送失败,先用 git pull 拉取并合并

  2. 如果合并有冲突,则解决冲突,并在本地提交

  3. 没有冲突或者解决掉冲突后,再用 git push origin branch-name 推送就能成功!

如果 git pull 提示 “no tracking information” , 则说明本地分支和远程分支的链接关系没有创建,用命令 git branch --set-upstream branch-name origin/branch-name

日志 - log

1
2
3
4
5
6
7
8
9
10
11
12
13
14
15
16
17
# 查看完整历史提交记录
git log

# 显示最后一次提交信息
git config --global alias.last 'log -1'

# format log
git config --global alias.lg "log --color --graph --pretty=format:'%Cred%h%Creset -%C(yellow)%d%Creset %s %Cgreen(%cr) %C(bold blue)<%an>%Creset' --abbrev-commit"

# 列出提交者贡献数量
git shortlog -sn

# 查看分支合并图
git log --graph

# 显示简要版的提交日志
git log --pretty=oneline

比较 - diff

1
2
3
4
5
6
7
8
9
10
11
12
# 查看所有文件改动
git diff

# 查看具体文件的改动
git diff ./filename

# 查看某个版本的改动
git diff d68a1ef2

# 查看某个文件的历史修改记录
git log ./filename
git show d68a1ef2 ./filename

分支 - branch

1
2
3
4
5
6
7
8
9
10
11
12
13
14
15
16
17
18
19
20
21
22
23
24
25
26
27
28
29
30
31
32
33
34
35
36
37
38
39
40
41
42
43
# 查看所有分支
git branch -a

# 查看本地分支
git branch

# 查看远程分支
git branch -r

# 创建分支
git branch <name>

# 创建空分支
git branch --orphan

# 切换分支
git checkout <name>

# 切换到上一分支
git checkout -

# 重命名当前分支
git branch -m <name>

# 创建并切换分支
git checkout -b <name>

# 合并 <name> 分支到当前分支
git merge <name>

# 合并 <name> 分支到 <target> 分支
git merge <name> <target>

# 删除分支
git branch -d <name>

# 强制删除
git branch -D <name>


# 删除远程分支
git branch -d -r origin/<name>
git push origin :<name>

标签 - tag

标签就像是版本库的快照,实质上它就是指向某个 commit 的指针

1
2
3
4
5
6
7
8
9
10
11
12
13
14
15
16
17
18
19
20
21
22
23
24
25
26
27
28
29
30
31
32
33
# 创建一个新标签,标签默认为 HEAD,也可以指定一个 commit id
git tag <tag_name>
git tag <tag_name> <commit_id>

# 查看本地所有标签
git tag

# 查看远程所有标签
git ls-remote --tags origin

# 查看标签详细信息
git show <tag_name>

# 指定标签信息,`-a` 指定标签名, `-m` 指定说明文字
git tag -a <tag_name> -m 'msg'

# 用 PGP 签名标签,`-s` 用私钥签名一个标签
git tag -s <tag_name> -m 'msg'

# 推送一个本地标签
git push origin <tag_name>

# 推送全部未推送过的本地标签
git push origin --tags

# 删除一个本地标签
git tag -d <tag_name>

# 删除远程标签
git push origin --delete <tag_name>

# 推送分支和标签,等效于 git push && git push --tags
git push --follow-tags

回滚 - reset

1
2
3
4
5
6
7
8
9
# 回滚上一个版本,`HEAD`表示当前版本,`HEAD^^` 表示上上个版本,也可以用类似于 `HEAD~3` 来表示要回退到哪一个版本,`--hard` 撤销 commit,并且把修改同时撤销
git reset --hard HEAD^


# 回滚到指定 commit
git reset --hard e6d8ce4

# 回滚之后不会显示在 log,可以通过此查询回滚的版本号,(记录所有操作)
git reflog

恢复 - checkout

1
2
3
4
5
6
7
8
# 将当前版本库中的内容替换工作区的版本,无论工作区是修改还是删除,都可以“一键还原”
git checkout -- .

# 将已经添加到暂存区的文件撤销
git reset HEAD ./filename

# 丢弃工作区中的修改,恢复某个文件到当前版本库中的状态
git checkout -- ./filename

暂存 - stash

1
2
3
4
5
6
7
8
9
10
11
12
13
14
15
16
# 将当前工作区修改文件“储藏”起来
git stash

# 查看被储藏起来的项目
git stash list

# 恢复被储藏项目
git stash apply
# 删除 stash 内容
git stash drop

# 恢复的同时把 stash 内容也删除
git stash pop

# 恢复指定的 stash
git stash apply stash@{0}

忽略 - ignore

1
2
3
4
5
6
7
8
# -f 将 .gitignore 文件强制添加到仓库
git add -f <name>

# 检查文件是否符合 `.gitignore` 规则
git check-ignore

git check-ignore -v node_modules
.gitignore:40:node_modules/ node_modules

删除 - remove

1
2
# 删除文件,并添加到暂存区,等效于 rm file && git add file
git rm file

子模块 - submodule

子模块的操作默认都是 master 分支

  • 更换子模块分支
1
2
git config -f .gitmodules submodule.<submodule name>.branch dev
git submodule update --remote

.gitmodules 加了 -f 参数,修改提交后对所有用户有效

添加子模块

1
git submodule add <git repo> themes/next

添加子模块之后运行 git status, 可以看到目录有增加一个文件 .gitmodules,用来保存子模块的信息

1
2
3
4
5
6
7
8
9
10
$ git status
On branch master

Initial commit

Changes to be committed:
(use "git rm --cached <file>..." to unstage)

new file: .gitmodules
new file: theme/next

查看子模块

1
2
$ git submodule
c2f33fc76b500770e266c1c16f028807967cd121 themes/next (v7.1.1-4-gc2f33fc)

更新子模块

  • 更新子模块到最新版本

    1
    git submodule update
  • 更新子模块为远程仓库的最新版本

    1
    git submodule update --remote

克隆项目及子模块

  1. 先克隆仓库,再更新子模块

    1
    2
    3
    4
    5
    6
    7
    8
    9
    10
    # 克隆项目
    $ git clone https://github.com/xg4/blog
    # 查看子模块
    $ git submodule
    # 子模块前面 - ,说明子模块还未捡入
    -c2f33fc76b500770e266c1c16f028807967cd121
    # 初始化子模块,初始化模块只需在克隆父项目后运行一次
    $ git submodule init
    # 更新子模块
    $ git submodule update
  2. 递归克隆整个项目

    1
    git clone https://github.com/xg4/blog --recursive

修改子模块

在子模块中修改文件后,直接提交到远程仓库

1
2
3
git add .
git commit -m 'update'
git push origin HEAD:master

删除子模块

  1. 删除子模块文件夹

    1
    2
    3
    $ git rm --cached theme/next
    # 不带 --cached 参数直接删除文件
    $ rm -rf theme/next
  2. 删除 .gitmodules 文件中相关子模块信息

    1
    2
    3
    [submodule "themes/next"]
    path = themes/next
    url = https://github.com/theme-next/hexo-theme-next
  3. 删除 .git/config 中的相关子模块信息

    1
    2
    3
    [submodule "themes/next"]
    active = true
    url = https://github.com/theme-next/hexo-theme-next
  4. 删除 .git 文件夹中的相关子模块文件

    1
    rm -rf .git/modules/theme/next